Canva for Education isn’t just for students! Even teachers can get in on the fun! Create your own designs from scratch, or choose from our library of over 60,000 high quality, educational templates. The best part of all, it’s absolutely FREE! So, how does this translate into the classroom? Here are 10 different ways that teachers can use Canva in the classroom.
(Click on any image to jump to that section. This is NOT a paid post.)
Creating Email Signatures in Canva
An email signature is an important element of your communication. It shows your personality, introduces the person behind emails, and provides necessary contact information. Designing one in Canva is easy! Just search “Email signatures” in the search box to find plenty of templates to choose from. Looking for something a but more “teacher” and little less “business?” Check out our template! You can download the template by clicking here or the image below!
Creating Headers in Canva
Custom created headers are more important than just looks. Creating headers that are directly associated with your class are easier for students to identify, which can lead them to your content quicker. In Joe’s first grade class, he creates customer headers for everything. This tells his young learners that they’re the right place. Designing your own isn’t difficult and with Canva, it can be done quickly. Here’s an image to help save you some time - all the header dimensions you’ll need! Check out our pre-designed templates for Flipgrid, Wakelet, Google Classroom, Canva and Microsoft Teams.
A good practice here is to make sure that your images match across the different platforms. For example, if you’re using Wakelet, Flipgrid and Teams - it’s recommended that your class header / theme and picture are all the same. This allows students to quickly identify where they are supposed to be. To save some time, we’ve created and collected some of our favorites in the template below. Click here or the image below to download them for yourself!
Once you’ve decided on an image, you can resize it to fit the platform you’re designing for. Just use our header dimensions guide (pictured above) and resize the image appropriately. If you’re not sure how to resize the image in Canva, just follow the steps below!
Creating Newsletters in Canva
Communication with your students’ families is an important key to providing success for your students. Canva’s newsletter templates for school publications make designing easy - even while on the go. Teachers can build and maintain their newsletters on a desktop or mobile device. These templates can be printed and then copied, or simply send out the share link to your families to save paper. Updating your families has never been easier! Check out some newsletter templates by searching for “School newsletter,” or just “newsletter.” Check out one of our favorite templates below! Click here or the image below to download it and edit it for yourself!
Student Awards on Canva
Are you looking to motivate your students? Generic awards can have positive effects, but what if you could design target specific achievements that can be printed and shared - either on a computer or mobile device? With Canva, you can! These can be printed or shared digitally. Stop using outdated programs - there’s an easier way! Check out the templates to choose from. Just search for “Student Award” in the search bar.
Device Wallpaper and Backgrounds on Canva
If you’re in a situation where your students use shared devices (or perhaps you just want to be able to tell the devices apart from one another), you can design wallpaper and backgrounds on Canva. This will help keep your tech organized and easy to maintain. No more, “Did I put that app on iPad #7?” Wait…Which one is #7?” 😂
There are different sizes depending on your device. Check out our image below to guarantee your creating the appropriate size for your devices.
Generally speaking, when designing it’s always better to start with an image that’s too big. Trying to stretch an image that’s too small can cause it to pixelate. So, be careful with your sizes. If you’re looking for some inspiration, or just something easy - we’ve got you covered! Check out our templates! Click here or the image to download them!
Creating Lesson Plans, Worksheets and Resources on Canva
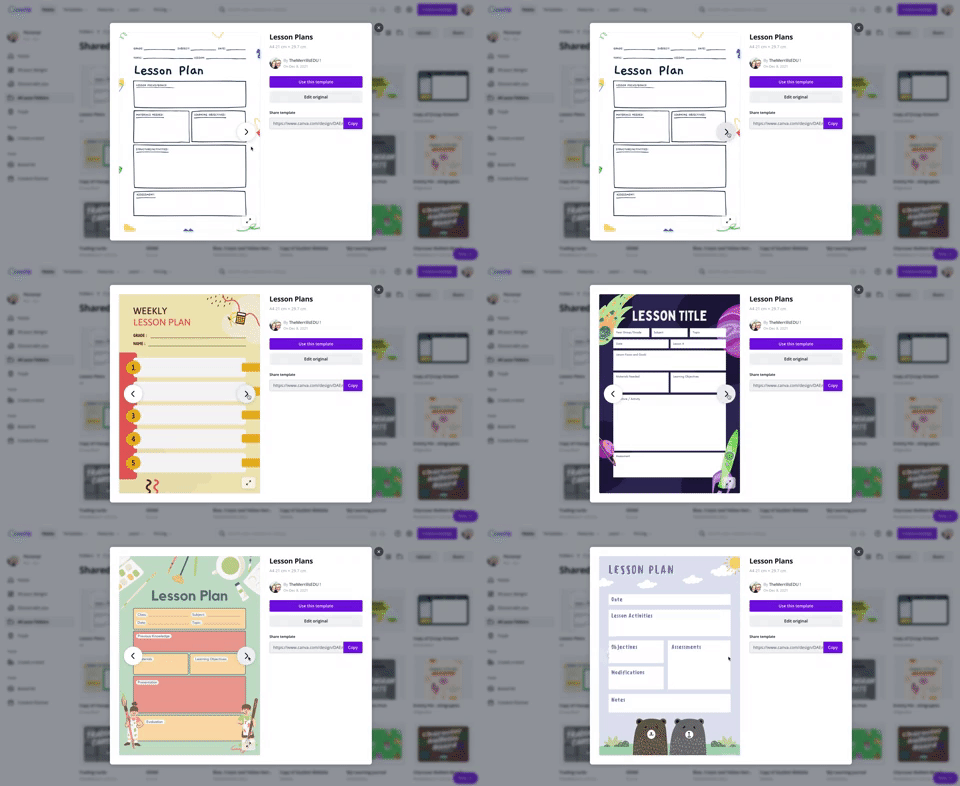
Using Canva to create lesson plans is definitely beneficial. For one, easy access to files provides quick and efficient editing. So, when a lesson doesn’t go as planned and you need to re-evaluate the next day’s plans, it can be done quickly (and from any device). We also love the idea of being able to share and collaborate on your plans with your teammates. Click on the image to the above to download some of our favorite templates. These templates can be duplicated for the day, or even the week.
Canva is also a great place to create your own worksheets and resources. The advantage here is that you can create target specific content that will deliberately meet the needs of your students - something that you cannot accomplish easily from downloading from other sites. Another advantage is that you can assign your resources to your students directly within Canva - so you can avoid the copier and save the environment! Check out a template we designed and a few others that we found below. Click here or the image above to get started!
Creating Anchor Charts on Canva
The whole point of an Anchor Chart is to provide an artifact of learning. They contain students' and teachers' thoughts, ideas and processes pertaining to the lesson. But often times, after the lesson concludes, the anchor charts fade into the distance. Creating your anchor charts on Canva serves a valuable purpose. For example, you will always have access to those files - meaning you can open them back up at any time. These can be shared with your students, but most importantly - collaborated on! You can start with a template, share it to the class and then have everyone working on the file at the same time. Now, your students can participate in the actual creation of the anchor chart. With a few clicks, this file can be exported / downloaded and uploaded into any LMS or even a Flipgrid video. Check out our example below and click here or the image to download it for yourself!
Yard Signs Created and
Printed on Canva
If you’re interested in looking for a new way to build your classroom environment, we love this idea: Yard signs! Create a yard sign that your students can take home for a week (or two) at a time and then bring back to give to the next person. Maybe you’ve got a student of the week or terrific kid that the entire neighborhood deserves to know about? Or perhaps it’s for a broader school-wide effort. Just design the sign by searching for “yard sign” on Canva. Design your sign and then send it to Canva to print! To print from Canva, follow the steps below.
The $30 fee includes a yard sign. Shipping is free unless you need the sign in a hurry. In which case, you can pay for expedited shipping. We’ve created two signs that you can download and edit as you see fit. Click here or the image below to get started!
Digital Classroom Badges on Canva
This is a great way to kick off the new school year or returning from a break. Educators can create digital classroom badges that can be designed for any types of rewards that you feel as though should be given out throughout the year. Some good examples include: “Tech Trainer or “CANva” (students who can teach others about Canva). Check out our template by clicking here or the image! Looking for some easy inspiration? We’ve got you covered! You can download our template for free! Click here or the image above to download it!
Embed Anything Created in Canva
A little known secret is that anything that you create in Canva can be embedded into your LMS or classroom websites. For example, if you create a resource in Canva, you can then embed it onto your Canvas or Schoology class page. To do so, follow the steps below:
Click the three dots on the top right side of the screen
In the search box, type “embed”
Click on Embed when it pops up, then click the purple “Embed” button
Copy the code and paste it into your destination (rich media editor)
BONUS: Canva Presentation Hacks
If you’re using Canva as a presentation tool, these hacks will come in handy! Note, you must be in presentation mode for these to work. To enter presentation mode, click the three dots on the top right, then click “Present.” Now for the fun:
Letter C for confetti rain
Letter D for a drumroll animation
Letter O for floating bubbles
Letter Q for quiet
Letter B to blur the current slide
Any number for a timer (1 for one minute, 2 for two minutes, etc.)
You can also press Shift + / or ? on your keyboard to open the magic effects menu.
To exit presentation mode, press ESC on your keyboard.
-- Let us know if you’re using any of these ideas in your classroom! Be sure to follow us on social media (@TheMerrillsEDU everywhere) and tag us! 👓👗
For more tips, tricks and lesson ideas for making learning more interACTIVE, check out our books The InterACTIVE Class and Flipgrid in the InterACTIVE Class on Amazon!


